


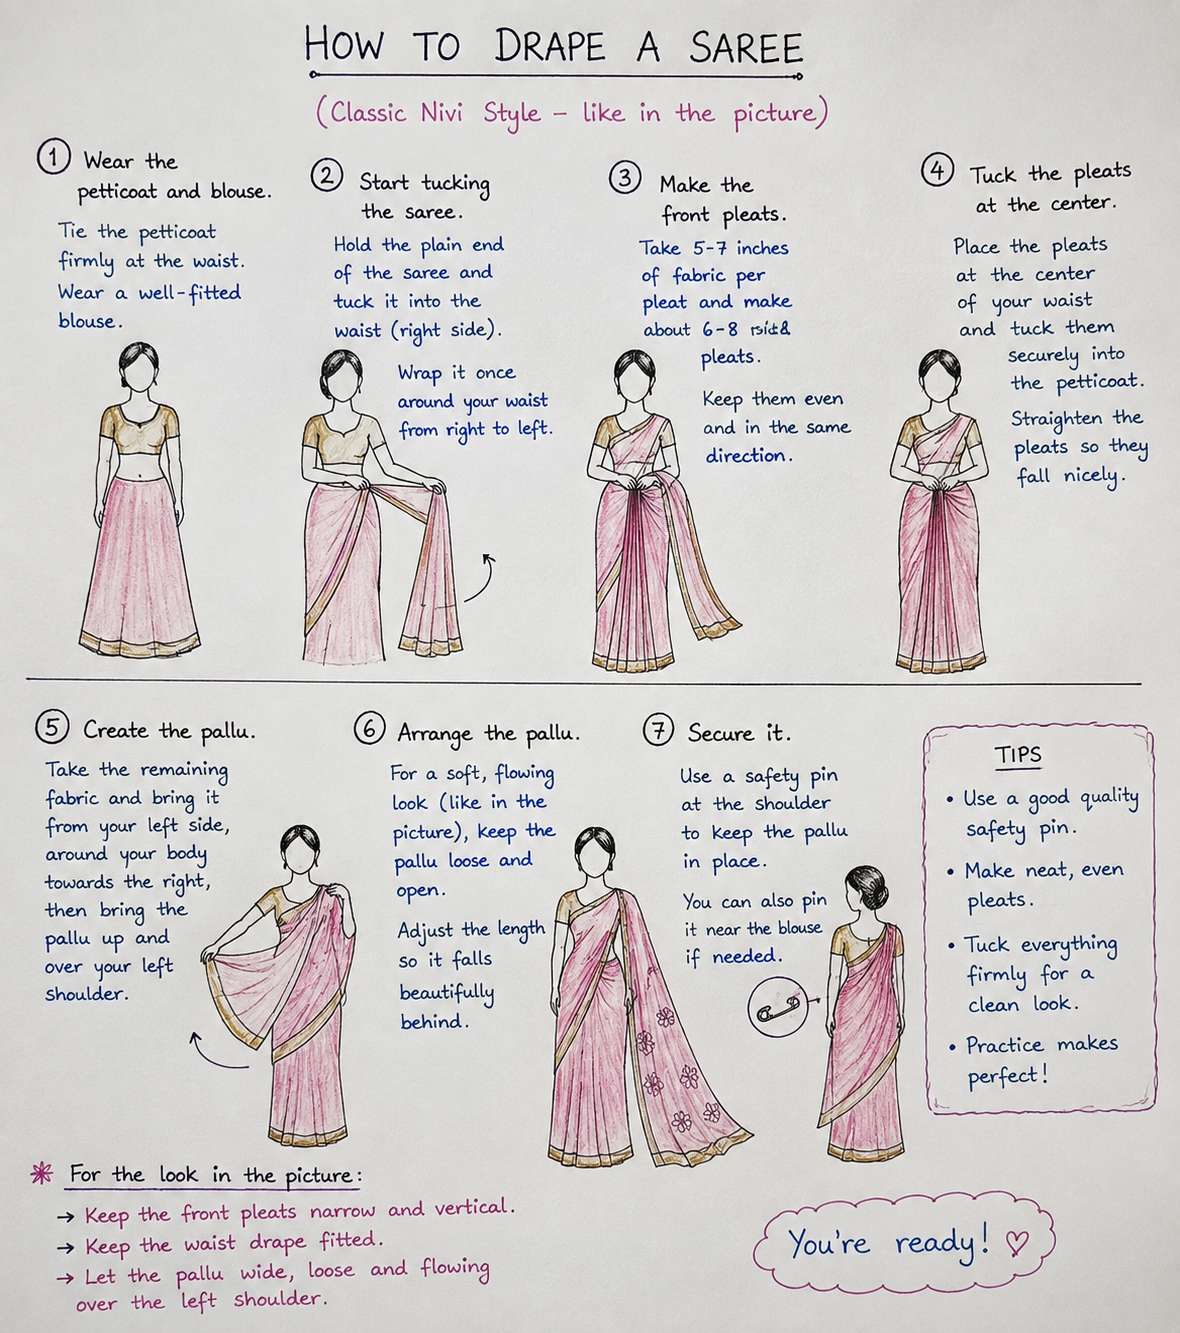
How To Drape Saree Perfectly ?
Mastering the Six Yards: How To Drape A Saree Perfectly
The saree is more than just an unstitched length of fabric; it is a timeless icon of grace, fluidity, and cultural heritage. For centuries, this versatile garment has adapted to every generation while retaining its unparalleled elegance. However, achieving that flawless, sculpted drape can sometimes feel intimidating for beginners or even experienced wearers trying a new fabric.
A perfect drape isn't about rigid rules; it’s about understanding your body shape, the fabric, and the occasion. Whether you are preparing for a grand wedding or seeking simple sophistication for a daily event, mastering the technique will give you the confidence to carry six yards with effortless poise.
Here is a step-by-step guide to achieving a impeccable saree drape, along with styling insights from the experts at Ethnic Export.
Step 1: The Foundation – Essentials Before You Drape
Before you handle the main fabric, ensure your foundation is set correctly. A saree’s silhouette relies heavily on what goes underneath.
-
The Petticoat (Shapewear): Choose a petticoat (now commonly replaced by figure-hugging saree shapewear) that matches the saree's base color perfectly. It must be fitted at the waist and hips to provide a smooth anchor for tucking the heavy fabric. Ensure the drawstring is secured tightly so the saree does not slip.
-
The Blouse: Your blouse should fit like a second skin. Whether it is a traditional cut or a modern, structured design, a well-fitted blouse ensures the entire upper drape sits smoothly without bunching.
-
Footwear: Always wear your final heels or sandals while draping. This is crucial for determining the correct length of the saree so that it skims the floor gracefully without exposing your feet or causing you to trip.
Step 2: Tucking and The First Round
Start by standing straight and facing a mirror.
-
The Beginning: Hold the non-pallu end (the plain corner) of the saree and locate the top edge.
-
Tucking: Begin tucking the upper edge of the saree into the waistband of your petticoat, starting from the right side of your navel. Move clockwise around your waist. Ensure the lower edge (the antar) is touching the floor perfectly.
-
One Full Circle: Tuck the fabric neatly all the way around until you complete one full circle and return to the navel. The fabric should be snug against your hips but not tight.
Step 3: Creating the Pleats (The Nivi Style)
This is often the most challenging part, but it defines the elegance of the drape.
-
Measure the Pallu: Hold the remaining loose end of the saree (the decorative pallu). Drape it over your right shoulder and measure the length. It should ideally fall to your knees or mid-calf. Adjust this length based on your height and the heaviness of the pallu.
-
Gathering the Waist Pleats: Take the remaining fabric between your right shoulder measure and your tucked waist. Gather this fabric neatly in both hands.
-
Making the Pleats: Using your thumb and index finger, start folding the fabric back and forth in uniform folds (about 5 inches wide). Continue until you have gathered all the loose fabric between your hands. Aim for 5 to 7 even pleats.
-
Aligning and Tucking: Hold the gathered pleats firmly. Shake them gently so they hang straight down. Ensure the inner pleats are slightly longer than the outer ones so they fan out beautifully. Neatly tuck the entire bunch of pleats into the petticoat waistband, slightly to the left of your navel. The pleats should face left.
Step 4: Managing the Pallu
-
Finalizing the Pallu: Take the pallu you measured earlier, bring it across your front, and lift it over your left shoulder.
-
Setting the Pallu: You can wear it open (flowing freely) for a more relaxed look, or you can create smaller, neat pleats (about the width of your shoulders) along the pallu edge. Secure these pleats neatly on your left shoulder using a small safety pin or brooch (pinned discreetly from the inside to avoid damaging the fabric).
Expert Styling Tips from Ethnic Export
Once the basic Nivi drape is mastered, use these styling secrets to elevate your look:
-
Use Safety Pins Discreetly: Always secure the pallu on the shoulder and the waist pleats at the waistband using small, sharp safety pins. This ensures your drape stays structured and neat throughout an event. Pin the pallu to your blouse strap, not just the blouse fabric, to prevent drooping.
-
Fabric Matters:
-
Silk and Banarasi: These fabrics hold pleats well due to their stiffness. They look best with very sharp, deep pleats.
-
Georgette, Chiffon, and Crepe: These are fluid and drape closely to the body. Because they are slippery, you may need extra pins along the waistline and a tighter petticoat grip to keep the pleats secure.
-
Organza and Tissue: Known for their volume, these require careful handling of the pallu. Wearing the pallu open often showcases the stiffness and sheen of the fabric better than pleated pallus.
-
-
Accessorize the Pallu: Enhance your drape with a sleek metallic or fabric waist belt (kamarbandh) placed just over the waist pleats. This not only adds traditional definition but also helps secure the drape.
Find Your Perfect Drape with Ethnic Export
Achieving the perfect drape begins with selecting the right saree for your body type and occasion. Whether you are looking for a crisp, structured silk for a wedding or a lightweight, flowing georgette for a party, Ethnic Export offers a breathtaking collection direct from the manufacturing hub of Surat.
We invite you to explore our diverse collections. You can browse specific weaves, contemporary textures, and grand traditional designs by navigating through our extensive sarees section. Find your next show-stopping outfit by exploring the links to our sarees categories and subcategories directly at the Ethnic Export Saree Collection.
Master the art of the drape and celebrate the timeless elegance of the six-yards. Happy Draping!
Image Generation Plan: Visualizing the Saree Drape
To support the blog post, we will generate a sequence of four photorealistic images illustrating the key stages of the draping process. The images will feature a consistent model with long, dark hair styled in a loose bun, wearing elegant makeup, and standing in a well-lit, minimalist studio with warm, traditional Indian decor elements (like a carved wooden mirror frame and soft, natural daylight).
The model will wear a sophisticated, solid color saree (a rich emerald green Banarasi silk with subtle gold zari borders) over a fitted cream blouse and a matching emerald petticoat. We will maintain visual continuity across all four generations.
-
Image 1: The Initial Tuck. Focuses on the model completing the first wrap and tucking the plain edge into the petticoat waistband.
-
Image 2: Measuring the Pallu Length. Shows the model holding the decorative pallu end over her shoulder, determining the correct length before pleating.
-
Image 3: Creating and Securing the Pleats. A detailed close-up showing the model’s hands meticulously forming and aligning the waist pleats.
-
Image 4: The Final, Flawless Drape. A full-length shot showing the completed Nivi drape, with the pallu pinned neatly over the shoulder and the waist pleats falling perfectly, ready for accessories.